
Imagine you work in the sales department and receive an enquiry from a new contact. As master data maintenance is a very important topic in your company, you create a Contact in Business Central. To reconfirm their contact data and comply with data protection regulations, you send a business letter to the Contact. It can be time consuming to write it in Word manually each time and difficult to set up a process to share that the letter was sent to the new contact with your colleagues. Let’s see how you can use the function to create and provide standard business letters directly from Business Central.
For the setup we first open Interaction Templates.
Press +New to create a new Code.
Enter the line for example as follows:
In the top menu, click on Create Interaction Word Template.

A page will open showing the different tables that will be exported to the Word template. Press Next, if it includes all required data.
In the next page you press Download a blank template.
Open your download folder and extract the ZIP file.
In the folder you will find two files. Open the Word file as this is our template.
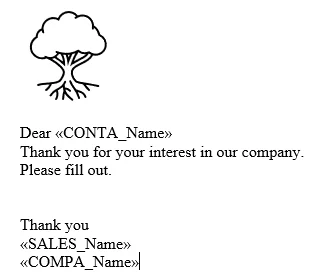
Adjust the Word file and add all the required data for the business letter like your logo and a signature.
To enter data from Business Central, go to Mailings and Insert Merge Field.

An example can be as follows. The <<CONTA_Name>> will be replaced by the name on the Contact card. The <<COMPA_Name>> by your company name entered in Business central.
Save the file.
Go back to the Business Central page where you have downloaded the template and press Next.
Click on Upload the template. A window will open where you can upload the created Word file.
Press Next and enter a name for the template in Code, for example New contact.
Go on with Next and afterwards with Finish.
Your Word Template is now created. As a last step you now need to add the code from step 15 (e.g. New contact) in the column Word Template Code for the Interaction Template created in steps 2 and 3.
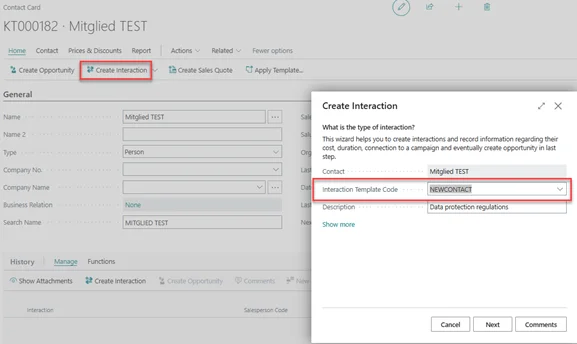
Now that the setup is finished, you can try it out. Therefore, open Contacts and open a Contact Card.
In the top menu click Home and Create Interaction.
In the field Interaction Template Code enter NEWCONTACT, the Description is filled automatically.
Click Next twice, followed by Finish.
In the History FastTab of your Contact Card, you will now see the interaction created including the date. You can even open the Content Preview if you click on Yes in the Attachment column.
Now you can create business letters faster and know where to find which letters your colleagues sent out. This is not only visible on the Contact Card but also in the Customer Dashboard. You can find out more about interactions in this HowTo: How to view all interactions with a contact in one overview? | acadon AG